How to Wash a Car with Water Using the Foam Cannon Method
Washing your car regularly keeps it looking great and protects the paint over time. However, not all washing methods are equal. Using the wrong technique can leave swirl marks, scratches, and a dull finish. The foam cannon method is one of the best ways to wash a car safely and effectively.
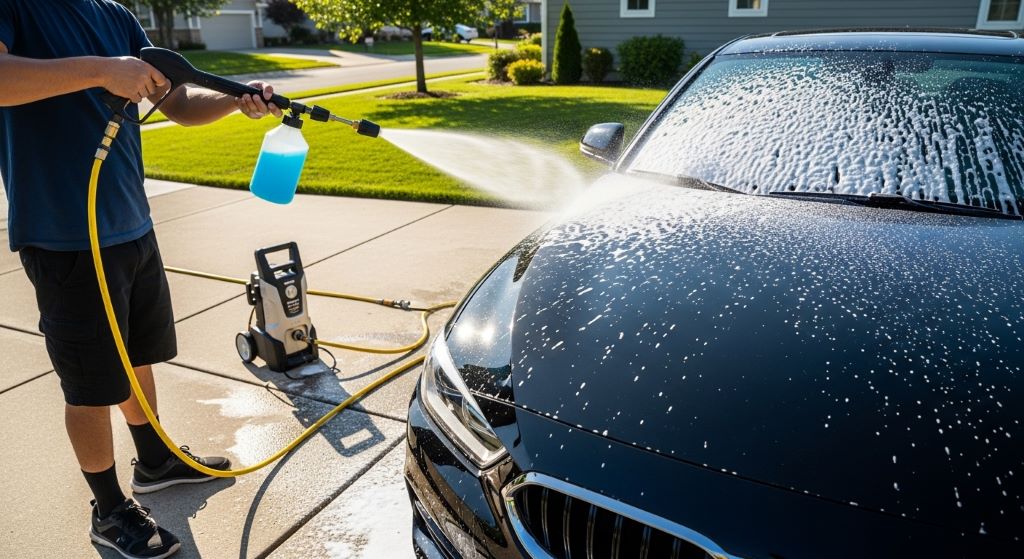
This method uses a pressure washer and a special foam cannon attachment to coat the entire car in thick, soapy foam. The foam clings to the surface, softens dirt, and lifts grime before you even touch the paint. Therefore, it dramatically reduces the risk of scratching your car during the wash process.
In this guide, you will learn exactly how to wash your car using the foam cannon method. We will cover the equipment you need, the step-by-step process, and tips for getting the best results every time.
What Is the Foam Cannon Method and Why Is It Better
The foam cannon method is a two-stage car washing technique. First, you apply a thick layer of foam to the car using a foam cannon attached to a pressure washer. Then, after the foam has had time to dwell and loosen dirt, you rinse it off and complete the wash with a microfiber mitt.
Traditional bucket washing often drags dirt particles across the paint. This creates fine scratches called swirl marks that become visible in sunlight. The foam cannon method reduces this risk considerably. The thick foam lubricates the surface and encapsulates dirt particles. Therefore, when you do make contact with the paint, there is far less abrasion.
Additionally, the foam cannon covers the entire car quickly and evenly. It saves time compared to hand-applying soap with a sponge. It also uses less water than leaving a hose running. For anyone who cares about their car’s finish, this method is well worth learning.
Equipment and Supplies You Will Need
Before you begin, gather all the necessary equipment. Having everything ready in advance makes the process smoother and more efficient.
The Foam Cannon
A foam cannon is a container that attaches to the end of a pressure washer lance. It mixes water, soap, and air to produce thick foam. Look for a foam cannon with an adjustable knob that controls foam thickness and spray pattern. Quality foam cannons are available from automotive detailing brands and typically cost between twenty and sixty dollars.
However, not all foam cannons are the same. Some are designed for electric pressure washers, while others work best with gas-powered units. Check the fittings and pressure requirements before buying to ensure compatibility.
The Pressure Washer
A pressure washer with an output of 1200 to 2000 PSI is ideal for foam cannon car washing. Electric pressure washers in this range are widely available and easy to use at home. Gas-powered washers produce higher pressure, but they can be too powerful for delicate paint if used incorrectly.
Therefore, if you are new to pressure washing, an electric model is a safer starting point. Always use a wide-angle nozzle when rinsing your car. A narrow jet at close range can strip wax and even damage paint.
Car Wash Soap
Not all soaps work well in a foam cannon. Use a dedicated car wash soap that is formulated for foam cannons. These soaps are highly concentrated and produce much thicker foam than standard car wash liquids. Additionally, choose a soap that is pH-neutral and wax-safe. Dish soap and household cleaners strip protective coatings and should never be used on automotive paint.
Microfiber Wash Mitt and Drying Towel
A high-quality microfiber wash mitt is essential for the contact wash stage. Microfiber is soft, absorbent, and gentle on paint. Avoid sponges and traditional cloths, as these tend to trap dirt and cause scratches.
Additionally, prepare two or three large microfiber drying towels for the final drying step. These absorb water quickly and reduce the chance of water spots forming on the paint.
Two Wash Buckets
Even with a foam cannon, you will still need two buckets for the contact wash phase. One bucket holds clean, soapy water for your wash mitt. The other holds plain rinse water. This two-bucket method keeps dirty water separate and prevents you from spreading grit back onto the paint.
How to Prepare Your Car Before Washing
Preparation is a step many people skip, but it makes a real difference to the final result. Take a few minutes to prepare your car and your workspace before you begin.
First, park your car in a shaded area. Washing in direct sunlight causes soap and water to dry too quickly. This leaves water spots and soap residue that are difficult to remove. Additionally, a cool surface allows the foam to dwell longer and work more effectively.
Next, close all windows and doors securely. Remove any loose accessories such as antennas or external mirrors covers if applicable. Rinse the wheel arches and lower sills first with plain water to remove the heaviest buildup of mud and debris. This protects your foam cannon nozzle from blockages.
Finally, fill your foam cannon bottle with the correct mixture of car wash soap and water. Most foam cannons require a ratio of one to two ounces of soap per bottle of water. However, always check the instructions for your specific soap, as concentrations vary between brands.
Step-by-Step Guide to Washing Your Car with a Foam Cannon
Step 1: Pre-Rinse the Entire Car
Attach your wide-angle nozzle to the pressure washer and rinse the entire car from top to bottom. This removes loose dirt, bird droppings, and surface dust before the foam is applied. Work from the roof downward so that dirty water runs down and away from areas you have already rinsed.
Pay special attention to the lower panels, wheel arches, and behind the wheels. These areas collect the most road grime and benefit from a thorough pre-rinse. Additionally, rinse the wheels and tires at this stage before switching to the foam cannon.
Step 2: Apply the Foam
Attach the foam cannon to your pressure washer and adjust the foam thickness knob to your preferred setting. A thicker, snow-like foam is ideal as it clings to the car for longer and gives the soap more time to work.
Start applying the foam from the bottom of the car and work upward. This may feel counterintuitive, but it ensures the lower panels receive a longer dwell time since they are typically the dirtiest. Then work from the roof down, covering the entire car in a thick, even coat of foam.
Do not miss any areas. Cover the roof, hood, trunk, doors, pillars, bumpers, and lower sills. The car should be completely white with foam when you are finished. Allow the foam to dwell for three to five minutes. However, do not let it dry completely, especially in warm weather.
Step 3: Agitate with a Wash Mitt
After the foam has had time to dwell, it is time for the contact wash. Dip your microfiber wash mitt into the soapy water bucket and begin washing the car in straight lines. Work from the top down, doing one panel at a time.
Use gentle, straight strokes rather than circular motions. Circular scrubbing creates swirl marks. Additionally, rinse your mitt in the plain water bucket after each panel to release any trapped dirt before reloading with fresh soapy water.
Focus extra attention on areas with heavier contamination such as the lower doors, bumpers, and wheel arches. However, be gentle around emblems, trim pieces, and rubber seals. These areas can trap grit and require careful handling.
Step 4: Rinse Off the Foam and Soap
Once you have washed every panel, switch back to the wide-angle pressure washer nozzle and rinse the car thoroughly from top to bottom. Work quickly and evenly, ensuring all soap residue is removed.
Pay close attention to door seams, mirrors, windshield wipers, and lower panel gaps where foam tends to collect and hide. A thorough rinse at this stage prevents streaks and spots from forming as the car dries. Therefore, take your time and go over each panel twice if needed.
Step 5: Dry the Car Immediately
Drying quickly after rinsing is essential to prevent water spots. Water spots form when minerals in the water are left to evaporate on the paint surface. They can be difficult to remove once they have bonded to the paint.
Use a large, plush microfiber drying towel and pat or drag it gently across the surface. Start with the roof and work down. Do not rub aggressively. Instead, allow the towel to absorb the water. Replace the towel with a fresh one when it becomes saturated. Additionally, open doors and the trunk to dry water from the door jambs and sills.
Step 6: Finish with a Detail Spray or Quick Wax
Once the car is dry, consider applying a quick detailer spray or spray wax. This step adds a layer of protection and enhances the shine. Spray the product onto one panel at a time and buff it in with a clean microfiber cloth using light, straight strokes.
This final step is optional but highly recommended. It adds shine, repels water, and makes your next wash easier. Furthermore, it extends the life of any existing wax or paint protection film on your vehicle.
Common Mistakes to Avoid When Using a Foam Cannon
Even with the right equipment, a few common mistakes can reduce the quality of your wash. Being aware of these issues helps you avoid them from the start.
- Using too much soap in the foam cannon bottle. More soap does not always mean more foam. Excess soap is hard to rinse off and can leave residue.
- Washing in direct sunlight. This causes the foam and water to dry before you can rinse, leaving spots and streaks.
- Holding the pressure washer nozzle too close to the paint. Keep the nozzle at least 30 centimeters away to avoid paint damage.
- Using only one bucket. Always use the two-bucket method during the contact wash to avoid reintroducing dirt to the paint.
- Skipping the pre-rinse. Applying foam to a heavily soiled car without pre-rinsing can cause the mitt to drag large dirt particles across the paint.
Additionally, never use a foam cannon that has been left with soap inside for an extended period. Dried soap residue can clog the nozzle and reduce foam quality. Always rinse the cannon with clean water after each use.
How Often Should You Wash Your Car Using This Method
For most drivers, washing the car every two weeks is a good routine. This prevents dirt and grime from building up and bonding to the paint. However, if you park under trees, drive on dusty roads, or live near the coast, you may need to wash more frequently.
The foam cannon method is gentle enough to use as often as needed without harming the paint or stripping protective coatings. In fact, regular washing with this technique helps preserve your paint in better condition over the long term. Therefore, establishing a consistent washing routine is one of the best things you can do for your car.
Conclusion
The foam cannon method is one of the safest and most effective ways to wash a car at home. It reduces the risk of scratches, covers the car quickly in thick foam, and makes the entire process more enjoyable. By following the steps in this guide, you can achieve a professional-quality result in your own driveway.
To summarize, always start with a thorough pre-rinse. Apply thick foam from bottom to top, then let it dwell. Follow with a gentle contact wash using a microfiber mitt and the two-bucket method. Rinse completely from top to bottom, then dry immediately to prevent water spots.
Additionally, invest in quality equipment. A reliable foam cannon, the right car wash soap, and good microfiber tools will last for years and pay for themselves many times over. Therefore, take your time, enjoy the process, and your car will reward you with a clean, protected, and brilliant finish every single time.
Frequently Asked Questions
1. Do I need a pressure washer to use a foam cannon?
Yes, a foam cannon requires a pressure washer to function correctly. The pressure is what forces water through the cannon’s mixing chamber to create thick foam. However, there are foam guns available that attach to a standard garden hose. These produce lighter foam than a true cannon but are a good alternative if you do not own a pressure washer.
2. What soap should I use in a foam cannon?
Always use a dedicated foam cannon car wash soap. These are highly concentrated and designed to produce thick, clinging foam. Choose a pH-neutral formula to protect wax and paint sealants. Additionally, avoid dish soap or household cleaners, as these strip protective coatings and can damage the paint over time.
3. How long should I leave the foam on the car before rinsing?
The ideal dwell time is three to five minutes. This gives the soap enough time to soften and lift dirt from the surface. However, do not allow the foam to dry completely on the car. In hot or sunny conditions, work in smaller sections or reduce the dwell time to two to three minutes to prevent the soap from drying and leaving residue.
4. Can the foam cannon method be used on cars with ceramic coating or paint protection film?
Yes, the foam cannon method is safe for cars with ceramic coatings or paint protection film. In fact, it is one of the recommended methods for maintaining these coatings. Use a pH-neutral soap to avoid degrading the coating. Additionally, avoid using any abrasive scrubbing tools, as even coated surfaces can be scratched by rough contact.
5. How do I clean and maintain my foam cannon after use?
After each use, remove the soap bottle and fill it with clean water. Run the pressure washer for a minute to flush soap residue from the cannon’s internal components. Then remove the bottle and allow the cannon to air dry before storing. Additionally, check the nozzle regularly for clogs and rinse it with warm water if the foam output seems reduced.
Related Topics:
The Semi-Truck’s Fuel Efficiency Unleashed: Driver’s Guide to Maximizing Range
Auto Wrecker San Diego: A Thriving Hub of Automotive Treasure