How To Fix RV Battery Drain In Denver, CO
To fix RV battery drain in Denver, first find the parasitic load, test the battery, and verify the charging system. Then remove unnecessary loads, repair faulty wiring, and maintain proper charging between trips. Denver sees freezing nights regularly, while RV electrical systems can keep drawing power even when appliances appear off.
That makes battery maintenance especially important for local RV owners and travelers using top campervan models for road trips. Denver also sits about 5,280 feet above sea level, creating distinct temperature and travel conditions.
Start With the Battery Drain Symptoms
Begin by identifying exactly when the battery loses power. A battery that dies overnight suggests a different problem than one failing after several days.
First, disconnect unnecessary 12 volt accessories and observe the battery voltage. Then record the reading before leaving the RV unused for several hours.
Common symptoms include dimming lights, weak water pumps, slow fans, inverter alarms, and repeated low voltage warnings. However, these symptoms can also indicate a damaged or aging battery.
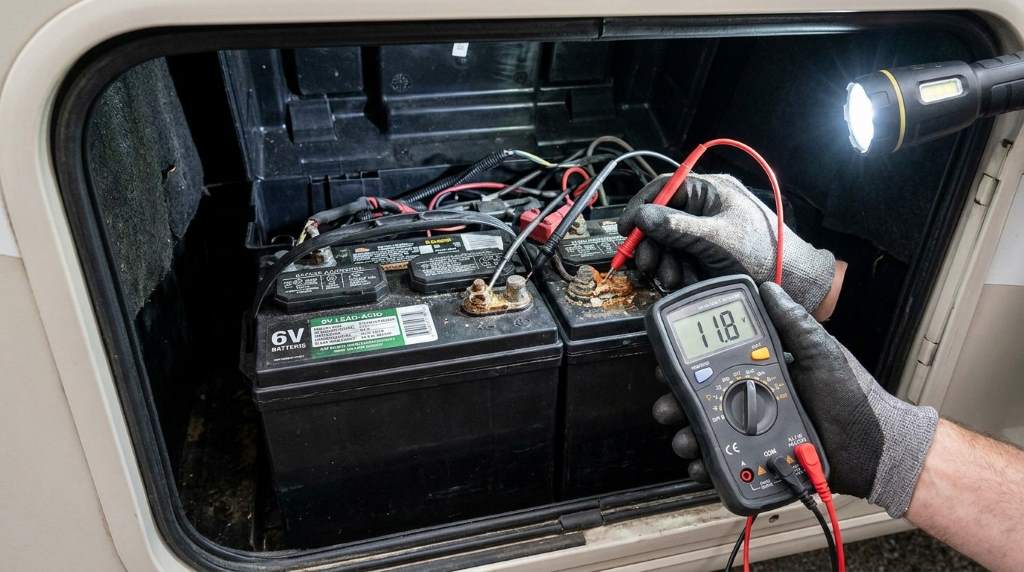
Check the battery terminals for corrosion, looseness, or damaged cables. Clean dirty connections carefully and tighten loose terminals before performing further electrical tests.
Also inspect the battery case for swelling, cracks, leaks, or unusual heat. Stop using a visibly damaged battery and arrange professional inspection promptly.
Know Which Battery You Have
Most RVs use house batteries for lights, appliances, electronics, and other living systems. Deep cycle batteries provide sustained power and suit these repeated electrical demands.
Starting batteries serve a different purpose because they deliver short bursts for engine starting. Therefore, confirm your battery type before replacing or testing it.
Record the battery voltage, amp hour rating, age, and manufacturer information. These details help determine whether excessive drain or battery deterioration causes the problem.
Find Hidden Electrical Loads
Parasitic loads often cause RV batteries to drain while everything appears switched off. Start with devices that remain connected to power continuously.
For example, check the refrigerator control board, propane detector, stereo memory, television systems, USB outlets, and inverter. Some devices consume small amounts individually but become significant over several days.
For a broader troubleshooting reference, review these common camper van battery issues before replacing expensive electrical components. The comparison can help you separate normal battery behavior from genuine electrical faults.
Test One Circuit at a Time
Use a digital multimeter or suitable current meter to measure electrical draw from the battery. Follow the meter manufacturer’s safety instructions before connecting it.
Turn off every appliance and close all doors before measuring resting current. Then remove individual fuses while watching the current reading.
When the current drops sharply after removing one fuse, investigate that circuit. Check every connected device before reinstalling the fuse.
This method works because it isolates the circuit instead of guessing which appliance causes the drain. Keep written notes during testing to avoid repeating the same checks.
Check the Battery Disconnect Switch
Your RV may have a battery disconnect switch near the battery compartment. Switching it off can separate house batteries from many RV circuits during storage.
However, disconnect switches do not always isolate every electrical device. Some circuits can remain active, so verify actual current draw with a meter.
If the battery still loses substantial charge after disconnecting the house system, investigate direct wiring. You may have an incorrectly connected accessory or a faulty component.
Test Charging From Every Source
A battery can appear to drain quickly when the real problem involves inadequate charging. Therefore, test every charging source before replacing the battery.
Start with shore power and confirm that the converter or charger operates correctly. Then test the alternator while the engine runs and inspect any solar charging system.
If you are planning electrical upgrades, this guide about financing a campervan conversion project can provide useful planning context. However, never add electrical equipment without confirming your existing system’s capacity.
Inspect the Converter or Charger
The converter should provide appropriate charging voltage when the RV connects to shore power. A failed converter can leave the battery undercharged despite hours connected to campground electricity.
Check the converter’s input power, output voltage, fuses, and visible wiring. Follow the manufacturer’s specifications instead of relying on generic voltage assumptions.
Also inspect the converter cooling area for blocked ventilation or excessive heat. Poor airflow can reduce charging performance and shorten component life.
Check Alternator Charging
The engine alternator should recharge the appropriate battery system while driving, depending on your RV’s electrical design. Modern vehicles may use complex charging controls rather than simple alternator wiring.
Measure charging voltage according to your vehicle and RV manufacturer’s procedures. If charging remains inadequate, inspect grounds, cables, isolators, relays, and battery management components.
Do not assume a long drive automatically restores a deeply discharged battery. Charging time depends on battery condition, charger output, battery capacity, and electrical loads.
Evaluate Solar Charging
Solar panels can maintain RV batteries, but shading and poor connections can reduce charging significantly. Denver’s strong sunlight can help, yet snow, dirt, and panel orientation still matter.
Inspect the solar controller display for charging status and error messages. Then examine panel wiring, connectors, fuses, and grounding connections.
Clean panels carefully and remove snow when conditions allow safe access. Never climb onto an RV roof without appropriate safety precautions.
Account for Denver’s Temperature Changes
Denver’s climate can create demanding battery conditions throughout the year. Historical climate data shows many nights below freezing, with January averaging about 17 freezing nights.
Cold temperatures can reduce available battery performance, especially when a battery already has low charge. Therefore, winter storage requires more careful battery monitoring.
Summer heat creates another concern because excessive battery temperatures can accelerate aging. Keep batteries properly ventilated and follow the manufacturer’s temperature recommendations.
Prepare for Winter Storage
Fully charge the battery using the correct charging method before storing the RV. Then disconnect unnecessary loads and use an appropriate maintenance charger when recommended.
Check the battery periodically instead of assuming storage automatically protects it. A slow parasitic load can eventually discharge the battery beyond a healthy level.
For flooded lead acid batteries, inspect electrolyte levels according to manufacturer instructions. Never add water to a sealed battery or ignore required personal protection.
Protect Against Freeze Damage
A fully charged lead acid battery handles freezing conditions better than a deeply discharged battery. Therefore, maintaining charge becomes especially important during Denver’s cold periods.
Keep the battery compartment clean and dry while allowing proper ventilation. Avoid placing heaters or improvised warming devices near batteries unless the manufacturer specifically approves them.
If your RV uses lithium batteries, follow the battery manufacturer’s low temperature charging requirements. Some lithium systems restrict charging automatically when temperatures fall below safe limits.
Repair Common Causes of Battery Drain
Once testing identifies the faulty circuit, repair the underlying cause rather than repeatedly charging the battery. Otherwise, the same drain will return after every trip.
Common causes include defective refrigerator boards, aging converters, faulty relays, damaged wiring, aftermarket electronics, and poorly installed accessories.
Inspect modifications carefully if the RV has aftermarket lights, audio equipment, security devices, solar equipment, or additional USB outlets. Improper installations can create continuous electrical loads.
Check Grounds and Connections
A poor ground can create charging problems and confusing electrical symptoms. Inspect battery negative cables, chassis grounds, converter grounds, and major connection points.
Look for corrosion, loose fasteners, broken cable strands, heat damage, or unusual discoloration. Repair damaged cables rather than relying on temporary tightening.
Ground connections deserve particular attention after winter driving or wet conditions. Moisture and road contamination can accelerate corrosion around exposed connections.
Inspect Aftermarket Equipment
Aftermarket electronics frequently create unexpected battery loads when installers connect them directly to battery power. Review every modification if battery drain began after an upgrade.
Check dash cameras, cellular routers, GPS trackers, alarm systems, televisions, amplifiers, and USB charging ports. Some devices continue operating even when their primary switches appear off.
Install suitable switches, relays, or manufacturer approved controls where appropriate. Avoid bypassing factory protection devices to solve repeated power interruptions.
Use a Simple Battery Drain Diagnostic Sequence
A consistent diagnostic process saves time and prevents unnecessary parts replacement. Follow the sequence below before purchasing another battery.
- Step 1: Fully charge the battery using the correct charger.
- Step 2: Record the battery’s resting voltage after charging.
- Step 3: Disconnect unnecessary electrical loads.
- Step 4: Measure resting current with appropriate equipment.
- Step 5: Remove fuses individually to isolate suspicious circuits.
- Step 6: Inspect the circuit causing the largest current reduction.
- Step 7: Test the converter, alternator, and solar controller.
- Step 8: Recheck battery performance after repairs.
Record every measurement because patterns often reveal intermittent faults. Repeat the test after several hours whenever the drain appears inconsistent.
Know When the Battery Needs Replacement
Replacement makes sense when testing shows poor capacity despite proper charging and minimal electrical draw. Do not replace a battery simply because the voltage drops after heavy use.
A professional load or capacity test can provide stronger evidence than a single voltage measurement. Battery age, usage history, discharge depth, and maintenance also affect remaining capacity.
Match the replacement battery to the RV’s voltage, physical dimensions, amp hour requirements, charging equipment, and battery chemistry. Never mix incompatible battery types within one bank.
Prevent Future RV Battery Drain
Prevention starts with a repeatable storage and travel routine. Check the battery before every trip instead of waiting for electrical symptoms.
Before parking the RV, switch off unnecessary loads and confirm the refrigerator settings. Then inspect the battery compartment and check for visible corrosion or loose connections.
During storage, use the appropriate maintenance strategy for your battery chemistry. Smart chargers and properly configured solar systems can help maintain charge when installed correctly.
Keep a simple maintenance log containing voltage readings, charging dates, repairs, and unusual symptoms. This record can help identify gradual battery deterioration before it interrupts a trip.
Use RV Electrical Systems Efficiently
Modern RVs can contain many connected electrical systems, including inverters, refrigerators, entertainment systems, and charging devices. RV industry standards increasingly address intelligent load management and low voltage protection.
Therefore, understand which loads require continuous power and which devices can remain disconnected. Turn off nonessential equipment whenever you expect several days without charging.
Consider an energy monitor if you frequently camp without shore power. Real time current information makes unusual consumption much easier to identify.
When to Call an RV Electrical Professional
Some battery drain problems require professional diagnosis because RV electrical systems combine multiple power sources. Seek qualified help when testing reveals overheating wires, repeated fuse failures, or unexplained current draw.
Also call a professional when you discover damaged wiring, battery swelling, burned connectors, or repeated converter failures. These conditions can create fire and equipment risks.
Stop troubleshooting immediately if you smell burning insulation or see smoke. Disconnect power safely when possible and obtain professional assistance before restoring the circuit.
For 120 volt shore power problems, use a qualified RV electrical technician. RV electrical safety standards continue evolving, including recent requirements addressing grounding protection.
Final Checklist Before Your Next Denver Trip
Before leaving Denver, confirm that the battery holds charge after resting without external power. Then verify charging from shore power, the engine, and solar equipment if installed.
Check all battery terminals and major grounds for secure connections. Next, switch off unnecessary electronics and confirm the battery disconnect system works correctly.
Watch for repeated low voltage warnings during the first trip after repairs. If the battery drains again, record when it happens and which systems were operating.
Finally, avoid replacing multiple components without testing them first. A measured diagnosis usually costs less and prevents the same electrical problem from returning.
Conclusion: Stop RV Battery Drain Before It Stops Your Trip
Fixing RV battery drain requires finding the actual electrical load, testing battery condition, and confirming every charging source. Denver’s cold nights make proper storage and battery maintenance even more important.
Start with simple checks, isolate suspicious circuits, and repair verified faults instead of guessing. If electrical testing reveals a dangerous or complex fault, contact a qualified RV technician.
Take time to inspect your battery before your next departure and keep a record of every reading. That small routine can protect your electrical system and help keep your next Denver road trip running smoothly.
Frequently Asked Questions
Why does my RV battery drain overnight?
A parasitic electrical load, damaged battery, faulty converter, or active accessory can drain an RV battery overnight.
Does cold weather drain an RV battery?
Cold temperatures can reduce available battery performance and make a partially discharged battery more vulnerable.
Should I disconnect my RV battery during storage?
Disconnect unnecessary loads during storage, but follow your battery manufacturer’s charging and maintenance instructions.
How can I find a parasitic drain in my RV?
Measure resting current and remove fuses individually until the abnormal current draw decreases significantly.
When should I replace my RV battery?
Replace the battery when proper charging and testing confirm that it no longer provides adequate usable capacity.