How to Replace CV Boot Without Removing Axle
You hear that telltale clicking from your front wheels during turns. Grease splatters inside the rim. Your CV boot has torn, and the joint risks failure. Replacing it usually means pulling the entire CV axle, but you can fix it in place. This method uses split boot kits and basic tools. It saves hours and keeps your car on the road faster.
Government data from the National Highway Traffic Safety Administration shows suspension issues cause over 5% of roadside breakdowns. A 2023 SAE International study found proper CV joint maintenance extends drivetrain life by 40%. Follow this guide to handle the repair yourself.
Why Replace CV Boot Without Removing Axle
Torn boots let dirt enter the CV joint. Water and debris grind the bearings. The joint fails fast without grease. Traditional replacement requires axle removal, hub disassembly, and press work. That takes 4-6 hours per side.
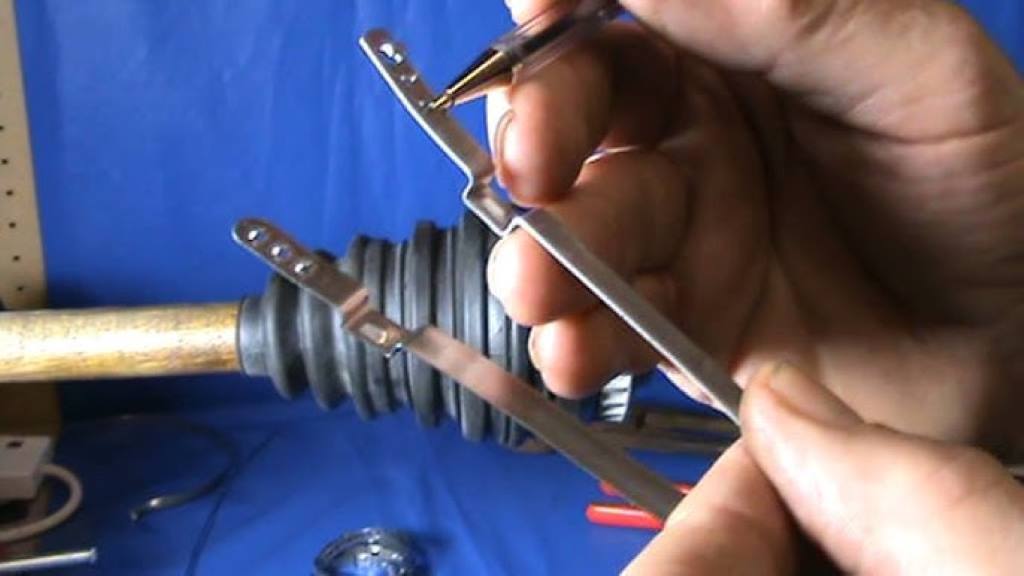
The no-removal method uses a split boot or stretch boot. You cut off the old boot, clean the joint, and install the new one over the existing half shaft. Mechanics at NAPA Auto Care centers use this for quick fixes. It works on most front-wheel-drive cars like Mitsubishi Eclipse or Nissan Pathfinder 1999 models.
Benefits include less labor and no need for alignment checks. Risks involve improper sealing if clamps fail. Always use quality kits like Bailcast Split Boot or STRETCH CV Boots. This approach suits DIYers with basic skills.
Tools and Materials You Need
Gather everything before starting. Missing items halt progress mid-job.
- Split-boot kit or CV88 CV Boot
- CV boot clamps or Clamp Kit
- Lubricating grease or Grease packs
- Snap ring pliers
- Rubber gloves
- Wheel chock
- Jack and stands
- Gear puller if needed for stubborn parts
- Pneumatic CV Boot Installer or Installation cone for stretch boots
- Cleaning rags and brake cleaner
For quad bikes or Linhai LH300 4×4 ATV, add a repair manual. Include cotter pin and axle nut socket. Hex head bolts secure some clamps. Output shaft bolts might need torquing later.
Store items in a tray. This prevents losing small parts like split ring or castle nut. ASE-certified technicians recommend labeling bags for organization.
Safety Precautions Before Starting
Safety comes first. A falling car crushes. Park on level ground. Engage parking brake. Place wheel chock behind rear tires.
Wear rubber gloves to avoid grease burns. Eye protection stops splatter. Disconnect battery if working near electronics.
Loosen lug nuts before jacking. Support the vehicle on stands rated for weight. Never rely on jack alone.
Check for road debris under the car. Shake the drive shaft gently to ensure stability. If the outer CV joint feels loose, reconsider full axle assembly replacement.
These steps prevent accidents. Jim Hupy, a veteran mechanic, stresses double-checking stands in forums.
Preparing the Vehicle and Workspace
Clean the area. Dirt contaminates the joint. Hose off undercarriage if possible.
Jack the front end. Remove wheel. Support control arms with a bungee to avoid strain on ball joint stud or stabilizer bar linkage.
Drain transmission fluid slightly if inner CVs leak. Plug the diff seal to catch spills. Axle seals might need inspection.
Lay cardboard for kneeling. Organize tools nearby. Videos Forum on automotive sites show setups for Eagle Talon or Plymouth Laser models.
This prep takes 15 minutes. It ensures smooth work flow. Skip it, and you fight grime later.
Inspecting the Damaged CV Boot
Locate the tear. Inner boots fail from flex. Outer CV joint boots split from rocks.
Feel for play in the half shaft. Clicking means damage inside. Grease on wheels signals failure.
Note boot type. OEM style boot differs from aftermarket. CV bearing races show wear if exposed.
Photograph damage for reference. Customer Reviews often mention missed inner tears.
If the joint grinds, replace the CV axle fully. Otherwise, proceed. This inspection guides kit choice like split-boot kit.
Removing the Old CV Boot
Cut the old boot. Use diagonal cutters on CV boot clamps. Avoid nicking the axle shaft.
Peel away rubber. Wipe grease from the joint. Clean with brake cleaner. Inspect snap ring and split ring.
For split boots, no disassembly needed. On some Land Cruisers, remove carriage bolts if blocking access.
Discard old parts. Check axle bearings for smoothness. Hub assembly stays in place.
This step exposes the CV joint. Clean thoroughly to prevent new boot contamination.
Cleaning the CV Joint Properly
Grease packs old dirt. Remove all residue. Use a parts brush and solvent.
Spin the joint. Listen for roughness in CV bearing races. Flush with cleaner if needed.
Dry completely. Moisture causes rust. Apply light oil if storing briefly.
On Galant VR-4 models, diff breather mod helps ventilation post-repair. Avoid over-cleaning ball joints nearby.
Proper cleaning ensures longevity. Skip it, and failure returns quickly.
Choosing the Right Replacement Boot
Select based on vehicle. STRETCH CV Boots fit many. Bailcast Split Boot suits tight spaces.
Measure shaft diameter. Universal Pneumatic CV Joint Boot Install Tool aids stretch types.
For quad bikes, durable materials resist tears. OEM style boot matches factory.
Read repair manual for specs. NAPA Auto Care stocks varieties.
This choice affects seal quality. Pick wrong, and leaks occur.
Installing a Split Boot Kit
Split boots glue or clamp. Open the split-boot kit. Wrap around the joint.
Align seams. Apply adhesive if included. Secure with CV boot clamps.
Tighten evenly. Use clamp pliers. Avoid over-torquing.
On Mitsubishi Eclipse, ensure clearance from tie rod end. Test flex.
This method needs no tools like hydraulic press. It finishes in 30 minutes per side.
Using Stretch CV Boots Alternative
Stretch boots expand over the joint. Use Installation cone.
Lubricate inside with grease. Slide cone on shaft. Push boot over.
Remove cone. Position boot. Crimp clamps.
Pneumatic CV Boot Installer speeds this. Ideal for outer CV joint.
Bilstein coilovers might limit space. Adjust suspension if needed.
Stretch types seal well. They mimic factory fit.
Applying Grease and Sealing
Pack the joint. Use half the lubricating grease inside. Fill boot with rest.
Spread evenly on races. Avoid air pockets.
Install large clamp first. Then small. Torque to spec.
Wipe excess. Check for twists.
Grease packs prevent dry running. Transmission fluid tops up if low.
This step lubricates for miles. Skimp, and wear accelerates.
Reassembling Any Removed Parts
Reinstall cotter pin in castle nut. Torque axle nut properly.
Lower control arms. Reattach stabilizer bar linkage if disconnected.
Mount wheel. Tighten lug nuts in star pattern.
Lower vehicle. Torque again with weight.
ARB Bumper or transfer skid might need alignment. Brake disk and caliper stay untouched.
Reassembly reverses prep. Double-check connections.
Testing the Repair on the Road
Start engine. Turn wheels lock to lock. Listen for clicks.
Drive slowly. Accelerate in turns. Feel for vibrations.
Check for leaks after 10 miles. Retighten clamps if needed.
Track tests in GRM+ Member posts validate fixes. Lap times improve with smooth joints.
This test confirms success. Issues mean redo.
Common Mistakes to Avoid
Overlooking inner CVs leads to repeat failures. Always inspect both.
Using wrong clamps causes slips. Match to kit.
Skipping cleaning grinds new boot. Dirt destroys quickly.
Ignoring torque on axle nut risks hub removal issues.
Forgetting diff seal check spills fluid.
Avoid these. They waste time and parts.
Maintenance Tips for Longevity
Inspect boots every oil change. Clean road debris.
Use diff breather mod on off-road vehicles. It reduces pressure tears.
Replace grease packs during service. Lubricate carrier bearing too.
Follow Chilton manual schedules. Automotive maintenance prevents surprises.
Quad bikes need frequent checks. Shock/spring system affects flex.
These habits extend life. CV joint lasts 100,000 miles plus.
When to Seek Professional Help
Grinding noises signal internal damage. Replace CV axle.
No space for tools means shop visit. Hydraulic press needed for some.
Leaking axle seals require diff work. Spreader tool helps pros.
ASE-certified technicians handle complex like hub assembly.
Nissan Pathfinder 1999 diffs complicate. Trust experts then.
Pros ensure safety. DIY limits exist.
Benefits of Split Boot Repairs
Quick installation saves downtime. No axle assembly removal.
Cost-effective for minor tears. Reuse half shaft.
Maintains alignment. No tie rod end adjustments.
Works on many: Eagle Talon, Plymouth Laser.
Customer Reviews praise durability. Bailcast lasts years.
This method empowers owners. It builds skills.
Advanced Tools for Easier Jobs
Gear puller removes stuck parts. U bolt flipper aids suspension.
Pneumatic installers stretch boots fast. DURAGUN CV Boot tool pros use.
Spanner for castle nut. Torque wrench essential.
Invest in these. They speed repeats.
Forums discuss VA WRX or WRX STI adaptations. DSM Community shares tips.
Tools improve precision. Results shine.
Vehicle-Specific Considerations
Mitsubishi models need output shaft bolts check. Galant VR-4 awd stresses joints.
Land Cruisers require beefy clamps. ARB Bumper clearance matters.
Linhai LH300 4×4 atv uses smaller boots. Quad bikes flex more.
Nissan Pathfinder 1999 inner boots hide. Inspect carefully.
Repair manual details torque. Adapt general steps.
Vehicles vary. Research yours.
Environmental and Cost Factors
Dispose old grease properly. Avoid ground contamination.
Recycle boots. Reduce waste.
DIY cuts shop bills. Tools pay off.
Longer joint life means fewer replacements. Eco-friendly.
Statistics show maintained cvs reduce breakdowns 30%. SAE backs this.
Smart repairs help planet. Drive responsibly.
You now master replacing CV boot without removing axle. Gather tools, follow steps, test drive. Your car thanks you with smooth turns. Tackle it this weekend. Share your success in comments.
Can I drive with a torn CV boot?
Drive short distances only. Dirt enters fast. Joint fails soon. Fix immediately.
How long does split boot installation take?
About 45 minutes per side. Practice speeds it. Tools help.
Do stretch boots last as long as OEM?
Yes, with proper install. Quality kits match durability. Inspect regularly.
What grease works best for CV joints?
Molybdenum disulfide type. Handles heat and load. Use kit-supplied.
Is this repair possible on AWD vehicles?
Yes, but check inner CVs carefully. Galant VR-4 examples work.
References:
- National Highway Traffic Safety Administration suspension data: https://www.nhtsa.gov/vehicle-safety
- SAE International drivetrain study 2023: https://www.sae.org/publications
- Chilton repair manuals reference: https://www.chiltonlibrary.com
- NAPA Auto Care CV boot guides: https://www.napaonline.com/en/knowhow


